Since we are now able to advertise data in BLE, let’s do some exciting stuff like controlling LED through our smartphone. The goal of this project is to create an application that will handle BLE data sent from our smartphone to turn on/off the green, blue and red LEDs mounted on the dev board. First thing to do, as usual, is to create a new project based on sd_adv_app, we’ll call it sd_led_app:
        $ cd nrf51/sd_adv_app
        $ make clean
        $ cp -r sd_adv_app/ sd_led_app/
Then change the project name accordingly in the Makefile and in main.c:
- Makefile:
# Project name
PROJECT_NAME = sd_led_app
- main.c:
#define APP_ADV_NAME "SD_LED_APP"
As you may have seen in the sd_adv_app code. When we disconnect the device from LightBlue, it doesn’t show up again in the scan device list. The reason is when we’ve been connected to our device, the advertisement stopped at the same time, then when a disconnection occured the advertisement is not automatically started again. So we need to catch the right BLE event to restart advertisement manually. If you remember we declared in our code a callback function called ble_evt_dispatch, we’ll catch the disconnect event in that function as following:
static void ble_evt_dispatch(ble_evt_t * p_ble_evt)
{
    // Catch BLE events here
    switch (p_ble_evt->header.evt_id)
    {
        case BLE_GAP_EVT_DISCONNECTED:
            // Manually restart advertisement when a disconnection occured
            ble_advertising_start(BLE_ADV_MODE_FAST);
            break;
        default:
            break;
    }
}
In BLE, to exchange data between two devices (a Peripheral and a Central), the concepts of Services and Characteristics are used. Actually a Service contains a list of Characteristics we can illustrate as follow:

An Characteristic is a data container that can be read or write depending of the privileges specified. The Characteristic value is called an Attribute. Like file permissions a Characteristic can be readable, writable or both at same time. For instance a temperature sensor could have a Characteristic containing an Attribute temperature coded on a unsigned int 16 bits with read only privilege. That means a Central could only read the temperature. In our case we want to control a led, so we’ll create a writable Characteristic containing an Attribute mirroring the led status. Services and Characteristics are designated by an UUID (16 bits for the Bluetooth official ones and 128 bits for the custom ones).
To handle data sent from the smartphone we’re gonna create a new BLE service called ble_led:
        $ cd nrf51/
        $ mkdir -p custom/ble_service/ble_led
        $ cd custom/ble_service/ble_led
        $ touch ble_led.c ble_led.h
        $ cd ../..
        $ touch custom.mk
As you can see we created three files, ble_led.c and ble_led.h will contain all the code mandatory to receive and transmit data from and to a Central, custom.mk is the makefile use to include ble_led source code in our project. Open custom.mk and add the following lines in order to properly include our new BLE Service:
CUSTOM_BLE_SRV_DIRECTORY = ../custom/ble_service

# BLE services
ifeq ($(USE_BLE_LED), y)
INCLUDES  += $(CUSTOM_BLE_SRV_DIRECTORY)/ble_led
SRC 	  += $(CUSTOM_BLE_SRV_DIRECTORY)/ble_led/ble_led.c
CPFLAGS   += -DUSE_BLE_LED
In project Makefile call custom.mk and add flag to include ble_led service:
...
# BLE services
USE_BLE_LED := y

include ../sdk/sdk.mk
include ../custom/custom.mk
# add option "-I" before each included folders
...
In ble_led.c we’re gonna add a init function that will declare the Service in the BLE stack:
- ble_led.c:
#include <stddef.h>
#include "ble_led.h"
#include "nrf_error.h"
#include "ble_types.h"
#include "ble_gatts.h"
#include "ble_srv_common.h"

uint32_t ble_led_init(ble_led_t * p_led)
{
    ble_uuid_t service_uuid;
    uint32_t   ret;

    // check if parameters are correctly set up
    if ((p_led == NULL) || (p_led_cb == NULL))
    {
        return NRF_ERROR_NULL;
    }

    p_led->conn_handle = BLE_CONN_HANDLE_INVALID;

    // create a custom base BLE uuid for our service (ble_led_service in ascii)
    const ble_uuid128_t base_uuid128 =
    {
        {
            0x62, 0x6c, 0x65, 0x5f, 0x67, 0x64, 0x70, 0x5f,
            0x73, 0x65, 0x72, 0x76, 0x69, 0x63, 0x65, 0x00
        }
    };

    // setup LED service uuid
    service_uuid.uuid = BLE_LED_SERVICE_UUID;

    // add our custom services in BLE stack's table
    ret = sd_ble_uuid_vs_add(&base_uuid128, &(service_uuid.type));
    if (ret != NRF_SUCCESS)
    {
        return ret;
    }

    // sdd led service declaration to the local server ATT table
    ret = sd_ble_gatts_service_add(BLE_GATTS_SRVC_TYPE_PRIMARY,
                                        &service_uuid,
                                        &(p_led->service_handle));
    if (ret != NRF_SUCCESS)
    {
        return ret;
    }

    p_led->uuid_type = service_uuid.type;

    return NRF_SUCCESS;
}
- ble_led.h:
#ifndef __BLE_LED_H__
#define __BLE_LED_H__

#include <stdint.h>

#define BLE_LED_SERVICE_UUID                 0x3560     /**< The UUID of the LED Service. */

typedef struct
{
    uint16_t     conn_handle;        /**< Handle of the current connection (as provided by the S110 SoftDevice). This will be BLE_CONN_HANDLE_INVALID when not in a connection. */
    uint16_t     revision;           /**< Handle of LED Service (as provided by the S110 SoftDevice). */
    uint16_t     service_handle;     /**< Handle of LED Service (as provided by the S110 SoftDevice). */
    uint8_t      uuid_type;          /**< UUID type assigned for LED Service by the S110 SoftDevice. */
}ble_led_t;

#endif //__BLE_LED_H__
Then in main.c we’ll update advertising_init function to also advertise the service information:
...
#define GREEN_LED_PIN					12

static ble_led_t _led;
...
static void advertising_init(void)
{
    uint32_t      err_code;
    ble_advdata_t advdata;
    ble_advdata_t scanrsp;
    ble_advdata_manuf_data_t manfdata;
    ble_uuid_t adv_uuids[] = {{BLE_LED_SERVICE_UUID, _led.uuid_type}};
    ...
    options.ble_adv_fast_timeout  = BLE_GAP_ADV_TIMEOUT_GENERAL_UNLIMITED;

    memset(&scanrsp, 0, sizeof(scanrsp));

    // number of UUIDs
    scanrsp.uuids_complete.uuid_cnt = sizeof(adv_uuids) / sizeof(adv_uuids[0]);
    // UUID
    scanrsp.uuids_complete.p_uuids  = adv_uuids;

    err_code = ble_advertising_init(&advdata, &scanrsp, &options, advertisement_evt_cb, NULL);
    APP_ERROR_CHECK(err_code);
}

int main(void){
    softdevice_init();
    gap_params_init();
    ble_led_init(&_led);
    advertising_init();
    ...
To tell to the Central that the services changed (in our case we actually added a service), we need to add before calling sd_ble_enable function in softdevice_init the following line:
// Tell the Central that Services on Peripheral changed. Without this line,
// the Central won't update the services list of our device.
ble_enable_params.gatts_enable_params.service_changed = 1;
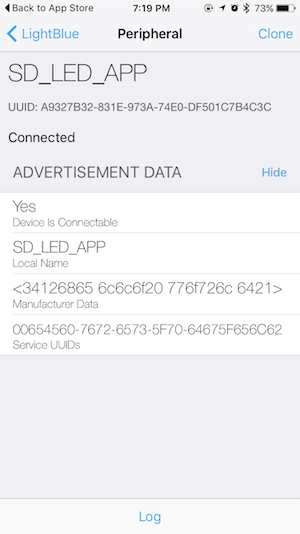
If you compile an run your code you should now see in the Peripheral nearby list on LightBlue, SD_LED_APP device with 1 Service:
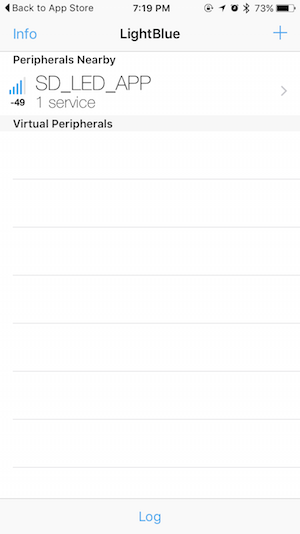
If you click on advertisement data, the service UUID will be listed:
Since the Service is now declared, we’ll see how to add a Characteristics. This Characteristics will be the LED status stored in an unsigned int 8 bits, also this value can be write by the Central in order to control properly the LED. Below the code allowing to add this Characteristic to our Service:
- ble_led.c:
// This function allows to add a Characteristic in our Service
static uint32_t ble_led_sta_char_add(ble_led_t * const p_led)
{
    ble_gatts_char_md_t char_md;
    ble_gatts_attr_t    attr_char_value;
    ble_uuid_t          char_uuid;
    ble_gatts_attr_md_t attr_md;
    uint8_t initial_led_status = 0;

    memset(&char_md, 0, sizeof(char_md));

    // set the Characteristic type to Write Without Response
    // it means Central won't except any acknowledgment from the Peripheral
    char_md.char_props.write_wo_resp = 1;

    // Here we set the Characteristic UUID
    char_uuid.type = p_led->uuid_type;
    char_uuid.uuid = BLE_LED_STA_CHAR_UUID;

    memset(&attr_md, 0, sizeof(attr_md));

    // add write permission
    BLE_GAP_CONN_SEC_MODE_SET_OPEN(&attr_md.write_perm);

    // Attribute configuration, the data is stored in stack memory space
    attr_md.vloc    = BLE_GATTS_VLOC_STACK;
    attr_md.rd_auth = 0;
    attr_md.wr_auth = 0;
    attr_md.vlen    = 0;

    memset(&attr_char_value, 0, sizeof(attr_char_value));

    // setup Attribute default value
    attr_char_value.p_uuid    = &char_uuid;
    attr_char_value.p_attr_md = &attr_md;
    attr_char_value.init_len  = sizeof(uint8_t);
    attr_char_value.init_offs = 0;
    attr_char_value.max_len   = sizeof(uint8_t);
    attr_char_value.p_value   = &initial_led_status;

    return sd_ble_gatts_characteristic_add(p_led->service_handle,
                                           &char_md,
                                           &attr_char_value,
                                           &p_led->led_status_handles);
}

uint32_t ble_led_init(ble_led_t * p_led, ble_led_cb_t * p_led_cb)
{
...
    // add LED status Characteristics
    ret = ble_led_sta_char_add(p_led);
    if (ret != NRF_SUCCESS)
    {
        return ret;
    }

    return NRF_SUCCESS;
}
By running your code now, you should be able to see the services on LightBlue app. You should also be able to click on the Service:

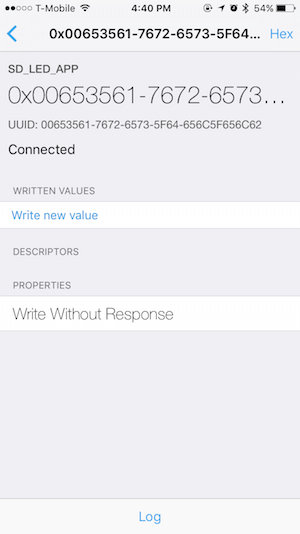
As you can see, there is a field called “Write new value”, we’ll use it to send write data to our Service and thus change the led status. All we need is to catch the correct BLE event in our Service and transfer it to our user application. In ble_led.c we’re gonna add a function to parse Attributes event, this function will be called by ble_evt_dispatch function declared in main.c. We’re actually interested by only one event, the one telling us the Attribute has been written, it’s called BLE_GATTS_EVT_WRITE.
- main.c:
static void ble_evt_dispatch(ble_evt_t * p_ble_evt)
{
...
    ble_led_on_ble_evt(&_led, p_ble_evt);
}
- ble_led.c:
void ble_led_on_ble_evt(ble_led_t * p_led, ble_evt_t * p_ble_evt)
{
    if ((p_led == NULL) || (p_ble_evt == NULL))
    {
        return;
    }

    if (p_led->set_led_value != NULL)
    {
        // parse event id
        switch (p_ble_evt->header.evt_id)
        {
            case BLE_GATTS_EVT_WRITE:
                // check if the event is coming from the corresponding attribute handle
                if (p_ble_evt->evt.gatts_evt.params.write.handle == p_led->led_status_handles.value_handle)
                {
                    // transfer the event to the user application with the value received
                    p_led->set_led_value(p_ble_evt->evt.gatts_evt.params.write.data[0]);
                }
                break;

            default:
                // No implementation needed.
                break;
        }
    }
}
- ble_led.h:
...

typedef struct
{
    uint16_t     conn_handle;        /**< Handle of the current connection (as provided by the S110 SoftDevice). This will be BLE_CONN_HANDLE_INVALID when not in a connection. */
    uint16_t     revision;           /**< Handle of LED Service (as provided by the S110 SoftDevice). */
    uint16_t     service_handle;     /**< Handle of LED Service (as provided by the S110 SoftDevice). */
    uint8_t      uuid_type;          /**< UUID type assigned for LED Service by the S110 SoftDevice. */
    ble_gatts_char_handles_t     led_status_handles;  /**< Handles related to the LED Packet characteristic. */
    void (*set_led_value) (uint8_t led_value);  /**< Callback function to set the led value in user application */
}ble_led_t;

...
void ble_led_on_ble_evt(ble_led_t * p_led, ble_evt_t * p_ble_evt);

#endif //__BLE_LED_H__
In this code we used a callback function called set_led_value, this function will help us to change the led value in the user application. So we just need to set and implement this callback in main.c:
- main.c:
#define LED_OFF          0
#define LED_SET_RED      1
#define LED_SET_GREEN    2
#define LED_SET_BLUE     3


static void led_set_cb(uint8_t value)
{
    NRF_GPIO->OUTSET = (1UL << RED_LED_PIN);
    NRF_GPIO->OUTSET = (1UL << BLUE_LED_PIN);
    NRF_GPIO->OUTSET = (1UL << 12);


    switch(value)
    {
        case LED_OFF:
            NRF_GPIO->OUTSET = (1UL << RED_LED_PIN);
            NRF_GPIO->OUTSET = (1UL << BLUE_LED_PIN);
            NRF_GPIO->OUTSET = (1UL << GREEN_LED_PIN);
            break;

        case LED_SET_RED:
            NRF_GPIO->OUTCLR = (1UL << RED_LED_PIN);
            break;

        case LED_SET_GREEN:
            NRF_GPIO->OUTCLR = (1UL << GREEN_LED_PIN);
            break;

        case LED_SET_BLUE:
            NRF_GPIO->OUTCLR = (1UL << BLUE_LED_PIN);
            break;
    }
}


static void led_init(void)
{
    // setup red led gpio in output mode
    NRF_GPIO->PIN_CNF[RED_LED_PIN] = (GPIO_PIN_CNF_SENSE_Disabled << GPIO_PIN_CNF_SENSE_Pos)
                                            | (GPIO_PIN_CNF_DRIVE_S0S1 << GPIO_PIN_CNF_DRIVE_Pos)
                                            | (GPIO_PIN_CNF_PULL_Disabled << GPIO_PIN_CNF_PULL_Pos)
                                            | (GPIO_PIN_CNF_INPUT_Disconnect << GPIO_PIN_CNF_INPUT_Pos)
                                            | (GPIO_PIN_CNF_DIR_Output << GPIO_PIN_CNF_DIR_Pos);
    // setup blue led gpio in output mode
    NRF_GPIO->PIN_CNF[BLUE_LED_PIN] = (GPIO_PIN_CNF_SENSE_Disabled << GPIO_PIN_CNF_SENSE_Pos)
                                            | (GPIO_PIN_CNF_DRIVE_S0S1 << GPIO_PIN_CNF_DRIVE_Pos)
                                            | (GPIO_PIN_CNF_PULL_Disabled << GPIO_PIN_CNF_PULL_Pos)
                                            | (GPIO_PIN_CNF_INPUT_Disconnect << GPIO_PIN_CNF_INPUT_Pos)
                                            | (GPIO_PIN_CNF_DIR_Output << GPIO_PIN_CNF_DIR_Pos);
    // setup red green gpio in output mode
    NRF_GPIO->PIN_CNF[GREEN_LED_PIN] = (GPIO_PIN_CNF_SENSE_Disabled << GPIO_PIN_CNF_SENSE_Pos)
                                            | (GPIO_PIN_CNF_DRIVE_S0S1 << GPIO_PIN_CNF_DRIVE_Pos)
                                            | (GPIO_PIN_CNF_PULL_Disabled << GPIO_PIN_CNF_PULL_Pos)
                                            | (GPIO_PIN_CNF_INPUT_Disconnect << GPIO_PIN_CNF_INPUT_Pos)
                                            | (GPIO_PIN_CNF_DIR_Output << GPIO_PIN_CNF_DIR_Pos);

    NRF_GPIO->OUTSET |= (1UL << RED_LED_PIN);
    NRF_GPIO->OUTSET |= (1UL << BLUE_LED_PIN);
    NRF_GPIO->OUTSET |= (1UL << GREEN_LED_PIN);
}

int main(void){

...
    // set the callback function
    _led.set_led_value = led_set_cb;
    ble_led_init(&_led);
    led_init();
}
Finally if you compile and run this application here what you should be able to do:

In a next post we’ll see how to use the PWM in order to select exactly the led color we want, and by the same time how to handle data packets and not only a uint8 value.

Very useful stuff, thank you Sir.
LikeLike
HI Jocelyn
I’m doing exactly that but on Atmel Studio 7 on windows.
Do you have that type of tutorial pls?
LikeLike
Hi, I’m sorry I don’t know Atmel Studio 7. But regarding the name I guess this software is only for Atmel MCU not Nordic ones.
LikeLike
Hello,
is there variant of this application based on SDK 6.1.0? I have nRF51822 IC rev.2 and according of Nordic’s compatibility Matrix the latest version of SDK, I can use, is 6.1.0
Thank you ion advance
best regads
Frodo
LikeLike
Hi Frodo, not yet, hope to have some time soon to refresh this blog with new stuff.
LikeLike